Separates an application in three logical components: Model, View, and Controller.
The Model represents the domain specific business data, usually coming from a database.
The View is the user interface with which the user interacts. The Controller receives events from the View and responds by updating the data in the Model, which,
in turn, notifies the View of the data changes.
The Model View Controller (MVC) design pattern is one of the earliest documented patterns. The pattern was originally described in 1979 by Trygve Reenskaug, then working on Smalltalk.
MVC, as its name implies, comprises three parts: Model, View and Controller. Each one has its own role and responsibility (area of concern). This is referred to as 'separation of concerns', in which each part is responsible for a clearly defined task.
The MVC pattern is best explained with an application like Microsoft Excel. Understanding this will greatly help you understand the core principles behind MVC.
Say, you have a comma-separated file (CSV) with average monthly temperatures for Paris, France during the last year. You open the file in Excel and see two columns of data (month and temperature in °C) in your spreadsheet. Then you decide to create a column chart and show the temperature changes over time. You select all 12 observations and place a chart on the spreadsheet. It looks good and you are pleased with the results (see figure below).
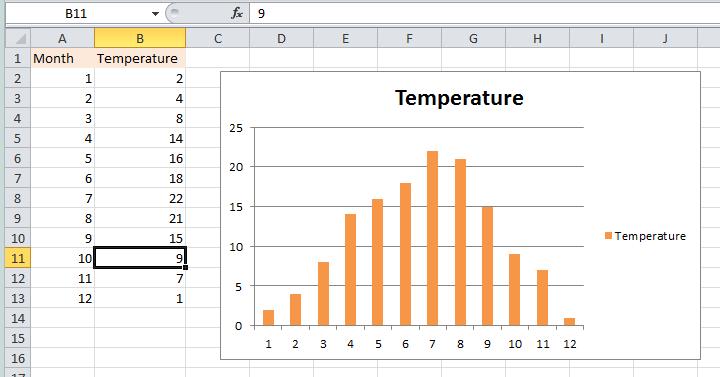
What is at work here is the MVC pattern. The data file with the temperature readings is the Model. The Grid (spreadsheet) and the Chart are two separate instances of a View. These Views represent two different ways of looking at the same data (the Model).
If the underlying data in the Model changes, we expect that both the Grid and the Chart to reflect this change. For example, if you change the temperature for October from 9 °C to 14 °C in the CSV file (Model) you expect to see this change in both the Grid and the Chart. And that is indeed what happens. The synchronization between the Views and the Model is the role of the Controller.
The Controller coordinates changes between the Model and one or more Views. Similarly, if a user changes the values in the Grid, you would expect the Chart to reflect this immediately (as well as the Model data if you choose to save the file). Again, it is the Controller that is notified of the change, which in turn changes the Model, which then notifies the Views to update themselves with the new model values. Below is a diagram of the Model, View and Controller parts and the dataflow among them.
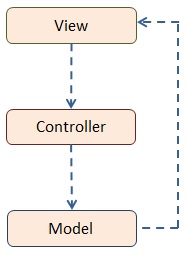
The dashed blue lines represent the data flow, which if you look closely is circular. It starts at the View where the user takes an action. The Controller is notified which then updates the Model. Finally, the Model changes are reported back to the View. The flow between the Controller and the Model is via method invocations, everything else is via events and event handlers.
Let's see how the data flow works in Excel. Suppose the user makes a data change in the Grid (the spreadsheet, which is a View). This triggers an event of which the Controller is notified. The Controller gets the changed data item and applies the same change to the Model. The Model then triggers another event of which all Views are notified. The Views get the data from the Model and change their displays accordingly.
The partitioning of the app using MVC helps developers to better organize a complex application like Excel. Long term it makes the application much easier to maintain and more extensible. For example, if a new Model needs to be supported (for example, a web service) or another View is introduced (for example, a report) then this will fit very easily into the existing structure.
As an aside: while preparing this document we used Microsoft Word. Word allows you to split the document which creates a second View (see below). When typing in one View, it immediately shows up in the other. Again, this is MVC in action.
Outside of desktop applications, MVC is also prominent on web servers with web development environments like ASP.NET MVC, Java/Spring MVC, PHP/CakePHP, and Ruby on Rails. More recently, MVC has also made big inroads on the client (browser) using JavaScript which is the topic of the next section.
MVC on the client
Let's recap the major parts of MVC and explore what it means to client-side web development:
Model: the model represents the domain specific data. These are business objects that are getting their data from a file or a database. For example, in an e-commerce app you may have model objects like Customer, Cart or Product. A Model notifies the page (the View) of any state changes that take place. So, if a special price of a Product changes, the View receives a data change event.
View: the view represents the user interface. In web apps this includes HTML elements and any templating you may have. A view receives data change events from the model and changes the DOM elements on the page accordingly. Say a new item is added to a shopping cart. The Cart model is updated with a new line item including product, quantity and cost and notifies the View. The View, in turn, will add a new row to a table with the relevant product information. Views also communicate with the Controller. For example, when a user clicks a button to delete an item from the shopping cart, the Controller gets notified.
Controller: the controller coordinates changes between the Model and the View. It receives events from the View, such as click, change, and drag & drop events. It responds to these events by updating the Model. The Model in turn notifies the View of a data change.
Let's look at MVC in a real-world web scenario: an online credit card payment page. A customer enters credit card information and then clicks a checkbox to inform that the payment address is the same as the shipping address. The effect is that the 4 payment address fields get copied over to the shipping address fields, so the user will not have to type these in again.
In the figure below, left is the pre-click status of the page. To the right is what the page looks like after the user has clicked the checkbox.
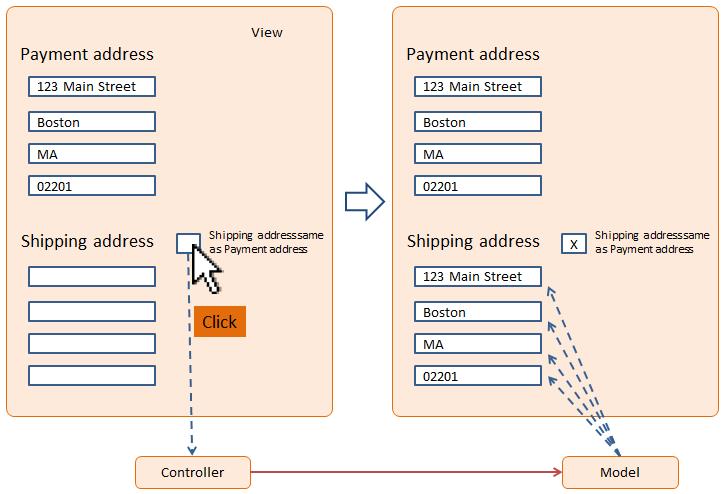
Here is what happens under the hood: when the user clicks the checkbox, the Controller gets notified of a click event. The Controller then retrieves all payment address values from the Model and copies these back into the Model's shipping address properties. The Model notifies the View of these changes and the View updates all shipping text fields with data from the Model.
The Controller is the intermediary between the page and the data, that is, the View and the Model. The typical flow in MVC is: View -> Controller -> Model -> View. The user takes action on the View and the View notifies the Controller. The Controller makes a decision and takes action which frequently involves changing the Model. Then the Model notifies the View of its state change and the View refreshes accordingly. In this system, each component has a clearly defined role.
Next, we will explore how to build a web page from scratch using MVC in JavaScript.
Implementing MVC in JavaScript
We will use a simple web page which allows us to better focus on MVC.
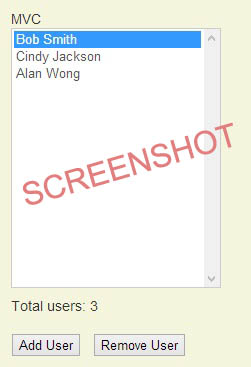
Our page has a list control with user names, and two buttons underneath; one to add a new user, and one to delete the currently selected user.
We also display the total number of users in the list which is updated when the list changes. Here is what the page looks like (you can see it below in action):
Let's look at the HTML:
<div>
    MVC<br />
    <select id="nameList" size="15">lt;/select>
    <div id="nameCount">Total users: 0</div>
    <button id="addButton">Add User</button>
    <button id="removeButton">Remove User</button>
</div>
To avoid clutter we removed style and class attributes.
Now let's explore the MVC JavaScript code. First we look at the Model:
var Model = function (names) {
    this.names = names;

    this.nameAdded = new Observer();
    this.nameRemoved = new Observer();
};

Model.prototype = {

    add: function (name) {
        this.names.push(name);
        this.nameAdded.notify(this.names);
    },

    remove: function (index) {
        this.names.splice(index, 1);
        this.nameRemoved.notify(this.names);
    },

    getNames: function () {
        return this.names;
    }

};


var Observer = function () {
    this.observers = [];
};

Observer.prototype = {

    attach: function (callback) {
        this.observers.push(callback);
    },

    notify: function (n) {
        for (var i = 0, len = this.observers.length; i < len; i++) {
            this.observers[i](n);
        }
    }
};
Remember that the Model is the domain or business object. It contains the data. The Model constructor function accepts an array of names which is assigned to a names property. The Model has two other properties: nameAdded and nameRemoved. These are observer objects that will notify any event handlers (callbacks) of any changes that take place in the names array. We will get back to the Observers shortly.
The Model's add method adds a new name to the list. Any callback that is registered with the nameAdded observer will be notified. Similarly, the Model's remove method removes a name from the list by index. It notifies any callback that is registered with the nameRemoved observer. Notice that the array of names is passed to either notify calls. This will allow the View, which is listening to Model changes, to refresh the list control with the entire data set.
Let's look at the Observer helper object, which by the way is an implementation of the GoF Observer design pattern. The observers maintain a list of callbacks that are notified when an event occurs. Callback methods register themselves with the attach method. The notify method triggers (executes) all registered callback methods while passing an event argument, named n, which in the case is a list of names.
So, the Model maintains the business data and notifies anyone that is interested of any data change that takes place in the list of names. We will see next that the View (the page) will be notified of these changes.
Here is the code for the View:
var View = function (elements) {

    this.elements = elements;
};

View.prototype = {

    init: function (model, controller) {

        var self = this;

        model.nameAdded.attach(function (n) {
            self.refresh(n);
        });

        model.nameRemoved.attach(function (n) {
            self.refresh(n);
        });

        this.elements.addButton.click(function () {
            var name = prompt('Add a new user name: ', '');
            if (name) controller.addName(name);
        });

        this.elements.removeButton.click(function () {
            var index = self.elements.nameList.get(0).selectedIndex;
            if (index != -1) {
                controller.removeName(index);
            } else {
                alert("No user was selected");
            }

        });

        this.refresh(model.getNames());
    },

    refresh: function (names) {

        this.elements.nameList.html('');

        for (var i = 0, len = names.length; i < len; i++)
            this.elements.nameList.append(
                '<option>' + names[i] + '</option>');

        this.elements.nameCount.text("Total users: " + len);
    }
};
The View represents the user interface. Its constructor function accepts a list of DOM elements which it will interact with. They are stored in a property named elements. These elements are jQuery elements which makes modifying them very easy. The View has two methods: init and refresh.
The init method is called only once. Two arguments are passed: model and controller. It is in this method that all callback relationships and actions are established. In init the this value is assigned to a local variable called self. The self variable is kept in a closure together with the arguments (model and controller) which ensures that all nested method bodies have access to the correct objects. Note that we could have also used bind(this).
In init two callback functions are attached to the Model's nameAdded and nameRemoved events. Whenever the Model triggers these events the list on the page gets refreshed with the new set of names. The parameter n is the list of names which is passed on to the refresh method.
Next we are attaching click handlers to the 'add' and 'remove' buttons. The add handler receives a new user name and passes the information on to the Controller. The remove handlers checks which name is currently selected and passes the index on to the Controller.
The last line in init is a call to refresh with the current set of names. This call initializes the page with the starting set of names (there will be 3).
The View's refresh method accepts an array of names. It clears the list and then appends each name to the list control. As a final step the total number of users in the list is updated.
The Controller in a typical MVC implementation is usually fairly lightweight; other than some business decisions it frequently is a pass-through to the Model. Here is the Controller for our example:
var Controller = function (model) {
    this.model = model;
};

Controller.prototype = {

    addName: function (name) {
        this.model.add(name);
    },

    removeName: function (index) {
        this.model.remove(index);
    }
};
The Controller constructor function accepts the model and keeps a reference in a property named model. The two methods addName and removeName are accessed only from the View. addName accepts a name parameter which is passed on to the Model's add method. Similarly, removeName accepts an index and passes it on to the Model's remove method.
Now that we have the fundamental MVC building blocks let's see how the program wires all this together. Here is the code that executes when the page is loaded.
$(function () {

    var model = new Model(['Bob Smith', 'Cindy Jackson', 'Alan Wong']);

    var controller = new Controller(model);

    var elements = {
        nameList: $('#nameList'),
        nameCount: $("#nameCount"),
        addButton: $('#addButton'),
        removeButton: $('#removeButton')
    };

    var view = new View(elements);

    view.init(model, controller);
});
A Model instance is created and initialized with 3 user names. Then a Controller is created with the model as its argument. Next, an object is created with jQuery elements that hold references to the 4 DOM elements we're interested in on this page. This is assigned to the elements variable. A View instance is created that gets passed the elements object. All three components, i.e. Model, View and Controller, are wired together by a call to view.init which establishes the event handling and callback relationships. This call also refreshes the page which will render the 3 initial names in the Model.
You can now add and remove users; we have a full implementation of the MVC pattern in JavaScript.
The MVC app below is ready to run: